Superspark

a year in food and life

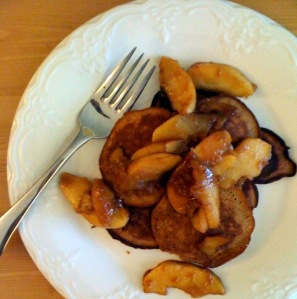
Gingerbread pancakes with butterscotch apples December 10, 2009

Filed under: breakfast,Dessert,food — superspark @ 3:24 am

Ah, iPhone, how I love you! While your camera is not exactly a fancy-schmancy Nikon D-70,  the ease and convenience are a godsend for those of us who  often find ourselves too lazy to deal with the whole rigamarole of uploading photos.  A blog post with no pictures is very sad, but a post with an iPhone picture?  I can live with that now and then.

Four months into our new lives as adults with two jobs, a mortgage, car payments, and the like, we’ve settled into a routine.  Well, as much of a routine as we can muster with Dylan’s surgical intern schedule.  Given the fact that they literally hold lives in their hands, it is more than a little alarming to think about the hours that surgeons keep and the chronic sleep deprivation they face.  They are now limited to 80 hours of work per week, but in generations past, no such protections existed.  Rest assured, your surgeon can no longer legally work more than a 27 hour shift.  Is that reassuring? Just wondering…

In any case, Dylan is often on call on the weekends, meaning that he goes in to work at about 5 am on Saturday and arrives home in a semi-stupor in the late morning on Sunday.  He is usually in charge of putting together delightful Sunday breakfast treats, but on those mornings, he is often barely functional.  So Maddie and I are now in charge and we try to pull something together right before he gets home so that its hot and ready to eat.  (My, don’t I sound domestic!)

Tis the holiday season, of course, and so this past weekend I dug into the Epicurious archives and found this recipe for gingerbread pancakes with butterscotch apples.   I wouldn’t blame you if your teeth started aching just looking at the photo and the recipe- this is definitely not the meal for those who prefer their breakfasts savory.  But for those of us who love a good pancakes with a little autumnal flair, these gingerbread pancakes with their yummy apple topping are worth it. And while I don’t know Sara Moulton, who first authored this recipe, I can fully support putting a sweet breakfast treat in a cookbook on weeknight meals. Breakfast, lunch, or dinner, these are a winner.

Gingerbread pancakes with butterscotch apples (serves 2-4)
(from Sara’s Weeknight Meals by Sara Moulton via Epicurious)

Ingredients:

2 tablespoons unsalted butter
2 large Golden Delicious apples (about 1 pound), peeled and sliced
1/4 cup packed light brown sugar
1 tablespoon fresh lemon juice
1 1/4 teaspoons ground cinnamon
1/2 teaspoon table salt
1 1/2 teaspoons vanilla extract
3/4 cup unbleached all purpose flour
1/4 cup granulated sugar
1 1/2 tablespoons ground ginger
1/2 teaspoon baking powder
1 large egg
3 tablespoons molasses
3 tablespoons vegetable oil, plus more for cooking the pancakes

1. Preheat the oven to 200°F. Melt the butter in a large skillet over medium heat. Add the apples and cook, stirring occasionally, until tender, about 10 minutes. Stir in the brown sugar, 2 tablespoons water, the lemon juice, 1/4 teaspoon cinnamon, and 1/4 teaspoon salt. Cook until the mixture bubbles. Remove from the heat and stir in the vanilla; transfer to a serving dish and set aside.

2. Meanwhile, in a small bowl stir together the flour, granulated sugar, ginger, remaining 1 teaspoon cinnamon, the baking powder, and remaining 1/4 teaspoon salt in a small bowl. Combine 1/4 cup water, the egg, molasses, and 3 tablespoons oil in a glass measuring cup; add to the flour mixture and stir with a fork until the mixture is just combined but not smooth. Add additional water if necessary to reach the consistency of pancake batter.

3. Brush a nonstick skillet with a little oil; heat over medium-low heat. Add the gingerbread mixture to the skillet a generous tablespoonful at a time and spread to make a 2 1/2-inch round; cook until lightly browned, about 3 minutes. Turn and brown on the other side, 3 to 4 minutes. Repeat until all the batter has been used. Keep the pancakes warm in the oven until all have been cooked.

4. To serve, divide the pancakes among dessert plates and top each serving with some of the apples.


Pumpkin cupcakes September 30, 2009

Filed under: baked goods,Dessert,food — superspark @ 1:30 pm

birthday bib and cupcake

Admittedly, I’ve been a very bad blogger these days, but when you are faced with diversions like spending time with a one year old as she ponders her first cupcake, sitting in front of a computer seems decidedly less appealing.  How can I justify writing about last night’s dinner when my little munchkin wants to read “Baby Faces” or “Brown Bear, Brown Bear, What do you See?” yet another time? Luckily there’s work and when I have a rare moment of down time I can try to catch up on all things Superspark.

So it’s taken me two months to write this post on pumpkin cupcakes.  Let’s put a positive spin on it and say that there’s no better time to make something pumpkin-tastic than October.  Had I posted it back in August, you might have thought it utterly untimely.  But August was Maddie’s first birthday and given that her nickname around the house is Pumpkin, there seemed no other choice but a pumpkin cupcake when it came time to introduce her to her first sweets.

So how were the cupcakes, which came from this recipe on the beloved blog, Smitten Kitchen? For firsthand evidence, I’ll refer the baby-lovers our there to this video of Maddie’s reaction. For the baby-haters who can’t stomach sitting through two minutes of utter cuteness, let’s just say, she hasn’t developed her Mama’s sweet tooth…yet. As for the rest of us, we thought the cupcakes were quite lovely and we were more than happy to eat Maddie’s share.

We particularly recommend the cream cheese frosting, which was super easy, super tasty (we omitted the maple because I’m kind of a maple hater) and definitely one to keep for future baking. The pumpkin cupcakes themselves were good, if not the most exciting cupcake I’d ever had. But as a whole- lovely in August, even better now that autumn is here.

Pumpkin Cupcakes With Cream Cheese Frosting
Adapted from David Leite

Makes 17 to 18 cupcakes

Ingredients:

1 stick unsalted butter, room temperature, plus more for greasing pans
1 cup firmly packed dark-brown sugar
1/3 cup granulated sugar
2 cups cake flour
2 teaspoons baking powder
1 teaspoon baking soda
1 teaspoon ground cinnamon
1 teaspoon ground ginger
1/2 teaspoon ground nutmeg
1/8 teaspoon ground cloves
1/2 teaspoon salt
1/4 teaspoon freshly ground black pepper
2 large eggs
1/2 cup buttermilk mixed with 1 teaspoon vanilla
1 1/4 cups canned solid-pack pumpkin

Frosting
Two (8-ounce) packages cream cheese, softened
1 stick unsalted butter, room temperature
2 cups confectioners’ sugar
1/4 cup pure maple syrup (optional)

Make the cupcakes:
1. Preheat the oven to 350° (175°C). Line a cupcake pan with 18 liners.

2. In a stand mixer, beat the butter and sugars on medium speed until fluffy, about 5 minutes. Meanwhile, sift the flour, baking powder, baking soda, cinnamon, ginger, nutmeg, cloves, salt, and pepper into a medium bowl.

3. Add the eggs 1 at a time to the mixer, scraping down the sides after each addition. Alternate adding the flour and milk mixtures, beginning and ending with the flour. Beat in the pumpkin until smooth. Scoop the batter among the cupcake liners — you’re looking to get them 3/4 full. Rap the filled pans once on the counter to release any air bubbles. Bake the cakes until a toothpick inserted into the center comes out clean, about 20 to 25 minutes. Cool the cupcakes on racks completely.

Make the frosting:
In a stand mixer beat all the ingredients on medium until fluffy. To assemble the cake, frost the top of one cake, place the other cake on top. Frost the sides and top, swirling decoratively. Refrigerate the cake for 30 minutes to set up frosting.


Individual molten chocolate cakes March 4, 2009

Filed under: Dessert,food — superspark @ 2:06 pm

maddie-birthday-cake

You can call this post “A Tale of Two Cakes”.   The first, pictured above, was our little Maddie’s first birthday cake.  Or to be more precise, her first half birthday cake.  She turned all of six months old in February and there was no way her dad and mom (lovers of baking cakes and eating cakes, respectively) would let the occasion pass without a special sweet treat to commemorate the event.    Hence the 1/2 birthday cake was invented, a two layer cake cut in half and stacked into four astounding “half” layers, then frosted all around.  Maddie, of course, hadn’t a clue what was going on and happily settled for dining on pureed carrots while the rest of us noshed on cake and feted her.

molten-chocolate-cakes

The second cake in question (pictured above) is decidedly more adult, a simple, elegant molten chocolate, made in individual portions and perfect for a romantic evening (not that there are many of those in our lives these days with Maddie around!).  It was posted here on Bitten, the New York Times‘ food blog, and suggested as a perfect Valentine’s Day dessert.  I suggest, however, that you needn’t wait nearly a year for another Valentine’s Day to come around.   Dylan and I whipped up a half batch of these warm and gooey cakes in just a few minutes one lazy Friday night as we curled up on the couch with a DVD.  With only a few minutes of prep time and 6-7 minutes of baking, with a little cooperation, you can make these cakes faster than you can run out to the corner store for a carton of ho-hum ice cream.  Just remember that the beauty of the molten chocolate cake is in the moist, oozing center so be sure to take them out of the oven while the middle is still a little jiggly.  If they make a bit of a pooling, fudgy mess when you invert them on the plates, as ours did, so be it- that’s what fingers are for.

Individual molten chocolate cakes (makes 4)

Ingredients:

1/2 cup unsalted butter, plus more to butter the molds
4 ounces bittersweet chocolate, preferably Valrhona
2 eggs
2 egg yolks
1/4 cup sugar
2 teaspoons flour, plus more for dusting (or dust with cocoa powder for aesthetics)

1. In the top of a double boiler set over simmering water, heat the butter and chocolate together until the chocolate is almost completely melted. While that’s heating, beat together the eggs, yolks, and sugar with a whisk or electric beater until light and thick.

2. Beat together the melted chocolate and butter; it should be quite warm. Pour in the egg mixture, then quickly beat in the flour, just until combined.

3. Butter and lightly flour four 4-ounce molds, custard cups, or ramekins. Tap out the excess flour, then butter and flour them again. Divide the batter among the molds. (At this point you can refrigerate the desserts until you are ready to eat, for up to several hours; bring them back to room temperature before baking.)

4. Preheat the oven to 450 degrees. Bake the molds on a tray for 6 to 7 minutes; the center will still be quite soft, but the sides will be set.

5. Invert each mold onto a plate and let sit for about 10 seconds. Unmold by lifting up one corner of the mold; the cake will fall out onto the plate. Serve immediately.


Pear cardamom upside down cake February 1, 2009

Filed under: baked goods,Dessert,food — superspark @ 9:30 am

pear-cardamon-upside-down-cake

We’ve had something of a revelation chez Superspark.  Turns out that at nearly six months old, Maddie is perfectly content to sit on the kitchen counter in her Bumbo chair and watch while we cook or clean or wash dishes.   Before this realization, cooking had to be strategically planned to coincide with naptimes or else required a little tag team action, one of us babysitting while the other let off some steam in the kitchen.  No more! This morning Dylan worked on pizza dough and homemade ricotta by the stove, I washed dishes from last night’s dinner, and Maddie sat in her chair trying with all her might to reach the  goodies scattered about her- a box of Life cereal, a tube of Airborne, and a post-it note.  Beyond making our lives so much easier, we’re hoping that this might mean that she grows up with a love of good food, cooking, and spending time with us in the kitchen.

This particular cake comes from the pre-revelation days, when cooking was more of a stealth activity, done quickly and silently lest Maddie wake up and the cooking necessarily come to an end.   I had never made an upside down cake before and with an overabundance of pears, I set out to make this cake in anticipation of a holiday party in December.  Luckily, turns out making an upside down cake is a breeze and was easily done during a single nap.  The distinctive scent of cardamom and caramelized sugar made these pears among the tastiness I’d ever eaten and the cake itself had me licking the bowl of batter and scrounging for crumbs once baked.  I was happy, no, delighted, when at the end of the party a single, perfect slice remained to eat for dessert the next day.

Although I was first inspired to make a pear cardamom cake by this recipe on one of my favorite blogs, Baking and Books, ultimately I used the variation found here on Epicurious, originally from the December 2000 issue of Gourmet.

Pear cardamom upside down cake (serves 8-12)

For caramelized pears:
4 firm-ripe Forelle or small Bosc pears (I used the latter)
1/2 cup sugar
1/2 stick (1/4 cup) unsalted butter

For cake batter:
1 1/2 cups all-purpose flour
1 1/2 teaspoons baking powder
1/2 teaspoon ground cardamom
1/4 teaspoon salt
3/4 stick (6 tablespoons) unsalted butter, softened
3/4 cup sugar
3/4 teaspoon vanilla
1 large egg
3/4 cup whole milk

1. Preheat oven to 375°F. Peel pears, then halve lengthwise and core. Spread sugar on a plate, then press cut sides of pear halves into sugar to coat, reserving remaining sugar.

2. Melt butter in a well-seasoned 10-inch cast-iron skillet over moderate heat until foam subsides. Reduce heat to low and arrange pears, cut sides down, decoratively in skillet. Sprinkle reserved sugar all around pears. Cook pears over moderately low heat until sugar begins to caramelize, about 15 minutes, and remove skillet from heat.

3. Whisk together flour, baking powder, cardamom, and salt. Beat together butter and sugar in a bowl with an electric mixer until light and fluffy. Add vanilla and egg and beat well. Add flour mixture and milk alternately in 3 batches, mixing at low speed after each addition until just combined.

4. Spoon batter over pears in skillet, gently spreading evenly and being careful not to disturb pears (batter will not cover tops of all pears). Bake in middle of oven until golden brown and a tester comes out clean, 20 to 25 minutes.

5. Cool cake in skillet on a rack 5 minutes. Run a thin knife around edge and invert a plate over skillet. Invert cake onto plate (wearing oven mitts), keeping plate and skillet firmly pressed together. Replace any fruit stuck to bottom of skillet if necessary.
Serve cake warm or at room temperature.


Strawberry shortcake August 17, 2008

Filed under: Dessert — superspark @ 12:01 pm

I tend to have a backlog of recipes that I start to write about on Superspark only to have them fall by the wayside when things get busy. Often they’re just not that exciting and I couldn’t manage the enthusiasm to finish the deed- copy the recipe, upload the picture, compose a few descriptive paragraphs (case in point: an unfinished brussels sprouts post from this past fall that has lingered untouched since then). On other occasions, the recipe and meal were perfectly good, so much so that I’d look forward to having them again (like the yet-to-be-published pumpkin-walnut pancakes from early 2007), but they’re fairly seasonal or no longer reside on the top of my mind. Still other recipes I have no good excuse for not sharing and they’re just too good to let slide. With that in mind, it seemed high time to share the recipe for this, Dylan’s birthday cake, which we made way back in early May (at least it was 2008).

In fact this was one of two birthday cakes, the primary one, if you will. As I wrote way back in May, when describing the other cake, Smitten Kitchen‘s glorious chocolate whipped cream icebox cake, we were having friends over to celebrate Dylan’s 31st, but unsure how many would actually show up, I decided to make a back-up cake, just in case. (Plus I’d been itching to make that icebox cake, but it had always met with protests from Dylan who seemed to think it less than a true cake if it didn’t require baking.) I hadn’t really planned to make a strawberry shortcake, truth be told. In actuality, I had wanted to make a now legendary coconut-lime curd layer cake that my pals Zarin and Amanda once had at a BBQ and describe as the best cake they’ve ever had. From two veritable cake fiends, that’s no small praise, but between the fact that they never actually got the recipe and Dylan’s dislike of coconut’s texture, it seemed perhaps an unwise choice.

With strawberries just coming into season in May, though, it seemed the perfect time to make a gorgeous strawberry shortcake with fluffy mounds of homemade whipped cream sandwiched in between slices of strawberry and classic white cake. We’re big fans of what I call “pancake-style” layer cakes, where you leave the sides unfrosted, allowing a peek inside the layers, with a “I just whipped this together” insouciance. So it was that this strawberry shortcake came together, from a recipe found in what Dylan considers his cake-baking Bible, The Perfect Cake.

And delightful it was- a perfect creamy, fruity antidote to the chocolate wafer icebox cake. In reality, I think nearly every guest happily accepted a slice of each and consumed them with gusto.

Strawberry shortcake (serves 10+)

Cake (Anna’s Swedish Butter Cake from Susan Purdy’s The Perfect Cake):
(we doubled this recipe to make two 2-layer 9-inch cakes)

Ingredients:

2 cups plus 2 tbsp sifted all-purpose flour
1 tsp baking powder
1/4 tsp salt
1 cup butter at room temperature
1 1/2 cups granulated sugar
2 large eggs at room temperature
3/4 cup milk
1 tsp almond extract (or vanilla extract)
confectioner’s sugar (optional)

1. Prepare pans by spreading butter or shortening on the bottom and sides. Dust with flour, tap out extra flour. Put rack in center of over, preheat to 350.

2. Sift together flour, baking powder, salt and set aside.

3. In a mixing bowl or with an electric mixer, cream together the butter and sugar until well blended. Add the eggs one by one, beating after each addition. Alternate adding dry ingredients and milk, beginning and ending with flour. Beat and scrape down sides after each addition. Stir in the almond or vanilla extract.

4. Pour batter into pans, level the top, then spread the batter slightly towards pan edges. Bake for 30 to 35 minutes or until the top is golden and a tester comes out clean. Cool the cake in its pans on a wire rack for 10 minutes, then run a knife blade around the edge of the cake. Top with another rack or plate, invert, and lift off the pans. Cool the cake completely before assembling the shortcake.

Stabilized whipped cream (from Susan Purdy’s The Perfect Cake; depending on how thick you like your whipped cream layers, you may want to double this recipe):

Ingredients:

1 pint heavy cream
4 tbsp confectioners’ sugar
2 tbsp cornstarch

1. Combine sugar and cornstarch in a small saucepan and gradually stir in 1/4 cup heavy cream. Bring to a boil and stir constantly and simmer for a few seconds until thickened. Remove from heat and cool to room temperature.

2. Whip remaining cream in electric mixer (chill bowl, cream, and beater first for best results) until it begins to thicken (when beater marks begin to show). Hand-whisk in the thickened cream mixture and whisk until stiff peaks form.

Assembly:

Ingredients:

Doubled cake recipe (see above)
1-2 times the whipped cream recipe (see above; we doubled it and had extra)
1-2 pints strawberries, half sliced thin

1. Using a long cake-cutting serrated knife, cut cake layers in half to create 4 layers. Place one on a cake dish.

2. Spoon a thick layer of whipped cream over the cake, up to about 1/2 inch from the edge. Place thinly sliced strawberries (or other berries) across the whipped cream.

3. Put the second layer of cake on top and repeat the layering process. Do the same with the third layer. Put the fourth and final layer on cake on top, then top with a thicker layer of whipped cream and whole berries.


Rhubarb strawberry pudding cake June 23, 2008

Filed under: Dessert,food — superspark @ 5:24 am

Like the fava beans I wrote about recently, rhubarb is one of those crops that has a fairly brief season so you have to just grab it when you see it. Unlike favas, rhubarb doesn’t require an lengthy, 2-step shelling process, however, making it infinitely more appealing. Sure you have to cook it- no one would recommend biting into a stalk of raw rhubarb- but with a little simmering, a little sugar, and some ingenuity, there are a myriad of ways to bring out that tart, delicious flavor.

Last year, I made excellent use of my rhubarb with strawberry-rhubarb-ginger ice cream and an awesome strawberry-rhubarb crumble. This year, I bought my rhubarb with the original intention of being a little less decadent and trying out Rachel’s recipe for rhubarb-oatmeal bread for the Coconut and Lime blogiversary contest. But as I went to make it, I discovered that our flour supplies verged on empty, making a bread out of the question. With the rhubarb rapidly aging I turned to my old friend, Epicurious, and discovered the intriguingly titled rhubarb strawberry pudding cake from the April 2007 issue of Gourmet.

I am a big fan of pudding cakes- those ooey, gooey messes that tend to come together with a minimum of fuss and more importantly, a minimum of dishes. I loved the chocolate pudding cake that I threw together with great acclaim for Valentine’s Day a couple of years ago, so trying a fruity variation seemed ingenious. (Not to mention that we had everything we needed right there in the fridge and pantry, making it seem even more like it was meant to be…) So pudding cake it was and really, I can only say two negative things about it: 1) that we didn’t have any ice cream or whipped cream to top it with because that would have been completely fabulous, and 2) that it isn’t particularly photogenic, which might dissuade some readers from trying it. But that would be a big mistake. It was light, fruity, and moist- cake-like in texture, but crumble-like in its informality, a lovely end to a spring evening. If you’ve still got rhubarb in season where you live and are looking for an easy, casual weeknight dessert, don’t overlook this humble little pudding cake.


Rhubarb strawberry pudding cake
(serves six to eight)

Ingredients:

1/4 cup water
1 1/2 teaspoons cornstarch
1/3 cup plus 1/2 cup sugar
2 cups chopped fresh rhubarb stalks (10 ounces)
1 cup chopped fresh strawberries (5 ounces)
1 cup all-purpose flour
1 3/4 teaspoons baking powder
1/2 teaspoon salt
1 large egg
1/2 cup whole milk
1 stick (1/2 cup) unsalted butter, melted and cooled slightly
1 teaspoon pure vanilla extract

1. Put oven rack in middle position and preheat oven to 400°F. Butter an 8-inch square glass or ceramic baking dish.

2. Stir together water, cornstarch, and 1/3 cup sugar in a small saucepan, then stir in rhubarb. Bring to a simmer, stirring constantly, then simmer, stirring occasionally, 3 minutes. Remove from heat and stir in strawberries.

3. Whisk together flour, baking powder, salt, and remaining 1/2 cup sugar in a bowl. Whisk together egg, milk, butter, and vanilla in a large bowl, then whisk in flour mixture until just combined.

4. Reserve 1/2 cup fruit mixture, then add remainder to baking dish and pour batter over it, spreading evenly. Drizzle reserved 1/2 cup fruit mixture over batter. Bake until a wooden pick inserted into center of cake portion comes out clean, 25 to 30 minutes. Cool in pan on a rack 5 minutes before serving.


Berry oatmeal crumble bars June 16, 2008

Filed under: baked goods,Dessert,food — superspark @ 6:24 am

Aside from our day jobs (as if they weren’t enough!), Dylan and I oversee an off-campus apartment building of about fifty undergraduates, making sure that the students are generally healthy and well, that they maintain a respectable level of hygiene and cleanliness, and that their needs are appropriately met. For many of you, no doubt, the thought of attending to the needs to dozens of college students might just have made your top five list of worst nightmares, but in reality, this is a pretty low-key bunch. In most cases, they’ve chosen to live off campus because they’re pretty self-sufficient and want to escape the noise, filth, and rowdiness of on-campus dorm life. And with such independent-minded charges, our job is easy, usually entailing little more than throwing a dessert or movie night every so often to make sure they’re alive and well.

Late this spring, feeling generally overfed, but missing baking, it dawned on me that I had found a perfect baking outlet. Not only were there fifty hungry mouths just waiting for a late-night snack on any given evening, but the university fund would my baking endeavors when they fell under the guise of student life. A perfect relationship, no? So every couple of weeks, I would pick something to make and then Dylan and I would walk around the apartment complex knocking on doors, checking in on the students, and bringing a dessert surprise. One such evening, I made these berry oatmeal crumble bars found here on Baking Bites. A oaty-crust (not unlike graham cracker crumbles), a layer of sweet jammy berries (in this case a mix of blueberries, raspberries, and blackberries), and more crumbles on top, these were a good way to satisfy my sweet tooth when I wasn’t in the mood for something chocolatey. Don’t be fooled into thinking these are healthy by the berries and the oats in the name- there’s plenty of sugar and butter to combat that notion- but they were tasty and as hoped, quickly disappeared thanks to our hungry charges.

Berry oatmeal crumble bars (makes 20)

Filling
3 cups fresh or frozen berries (I used Trader Joe’s frozen mix of blueberries, raspberries, and blackberries)
1 tbsp lemon juice
1/2 cup sugar
2 tbsp cornstarch

Crumble and Crust
1 1/2 cups all purpose flour
1 1/2 cups rolled oats (quick-cooking or regular)
1 cup brown sugar
3/4 cup butter, softened and cut into 7-9 large chunks
1/2 teaspoon baking soda
1/2 teaspoon salt
1 tsp vanilla extract

1. To make the filling: In a medium saucepan, stir together berries and lemon juice and cook medium heat until fruit is tender, about 8-15 minutes, depending on type of berries being used (strawberries take longer than other berries, usually).

2. In a small bowl, whisk together sugar and cornstarch, then stir into fruit mixture. Continue cooking until mixture comes to a boil. Boil for 1-2 minutes, until thick. Scrape berry filling into a medium bowl and set aside.

3. To make the crust: Preheat oven to 350 and lightly grease a 9×13″ baking pan. In a food processor (or large mixing bowl), combine flour, oats, brown sugar, butter, baking soda , salt and vanilla extract. Pulse until mixture is thoroughly blended and resembles coarse crumbs. Set aside 1 1/2 cups of this mixture in a medium bowl. Pour remaining crumb mixture into the bottom of the prepared baking dish, spread evenly and pat down. Place filling in dollops over crust and carefully spread to cover entire surface (this will be difficult to do, so take it slow). Squeeze reserved crumb mixture into large clumps with your fingers and sprinkle evenly over the top of the fruit filling.

4. Bake until golden brown, about 30 to 35 minutes. Cool completely on a wire rack before slicing.
Cut into 20 bars to serve.


Cardamom pudding with mango June 4, 2008

Filed under: Dessert,food — superspark @ 8:28 am

We’re kind of crazy about cardamom these days. Our friend Zarin went to India last summer and came back with a big bag of spices for us. They were all prepackaged in bright plastic bags and were labelled with some sort of identifying marks, but there was nothing written in English to give us any indication as to what was what. I spent some quality time sleuthing on Google, trying to look up photos of various common spices in the hopes of identifying them. The results of my detective work were mixed- there were a number that were readily identified and labelled, but also a whole slew that remain entirely unknown to this day. (Although now that I think about it, posting photos of them and asking the blogging world at large for their input might just do the trick!) Among those that were easily named were the little green cardamom pods.

I had certainly had cardamom before, but until actually breaking open the pods with mortar and pestle, I had no idea how fragrant and delicious it could be. Now, pretty much anything that prominently features cardamom rises quickly to the top of our list of things to make. This particular recipe comes from Sunset magazine and can be found here. Normally, I’m not really a pudding girl. It’s fine, but I’ll take a piece of cake or pie above it any day. However, with cardamom in the very name of the pudding, I couldn’t resist. Indeed, the flavor of my beloved spice was prominent, even when the pudding was topped with the mango sauce.

I will say, I made a couple of wee alterations to the recipe, but were I to do it again, I would try to follow it more precisely. For instance, finding that we had nothing but skim milk, I decided to go with it, making this an exceptionally healthy dessert. The flavor was terrific, but of course it just didn’t gel in quite the right way so that the texture was definitely off and it tasted sort of thin, rather than creamy. Which is not to say we didn’t scarf it down happily, but just that I’d use the suggested whole milk next time, if not a bit of cream, too. As a second recommendation, don’t put the mango in the blender, as the recipe suggests- ours instantly turned into something close to a puree, whereas what you really want is more of a chunky sauce to balance the smooth texture of the pudding. Again, it was a delicious mistake- what’s not to like about a mango sauce?- but I think the dish as a whole would have been better had I just chopped the mango by hand. Even so, the pudding made for a guilt free and refreshing summer dessert, mistakes and all.

Cardamom pudding with mango (serves six to eight)

Ingredients:
6 cardamom pods
4 1/4 cups whole milk
1/2 cup sugar
1/3 cup cornstarch
1/2 teaspoon ground cardamom
About 2 pounds ripe mango
2 tablespoons ginger-flavored liqueur (optional)
Fresh mint leaves (for garnish)

1. Crack cardamom pods by gently pressing with a rolling pin. Combine with 4 cups milk in a 3- to 4-quart pan; stir occasionally over medium-high heat until milk is boiling, 9 to 15 minutes.

2. Meanwhile, in a small bowl, mix 1/4 cup sugar, the cornstarch, and the ground cardamom. Stir in remaining 1/4 cup milk. When milk in pan is boiling, remove from heat and gradually whisk in cornstarch mixture. Return to medium-low heat and stir just until mixture comes to a boil, 3 to 7 minutes. Pour through a fine strainer set over a bowl; discard residue. Ladle pudding into 6 to 8 small bowls or ramekins (3/4- to 1-cup capacity). Let cool about 10 minutes, then cover and chill until cold and set, at least 1 1/2 hours.

3. Pit and peel mango. Cut flesh into about 1-inch chunks (you need 2 cups). In a food processor or blender, combine 2 cups mango, remaining 1/4 cup sugar, and ginger liqueur if using; whirl just until mango is coarsely puréed (mixture should be slightly chunky). Cover and chill.

4. Just before serving, spoon all of the mango mixture evenly over puddings. Garnish with mint leaves.


Cranberry lemon squares May 27, 2008

Filed under: baked goods,Dessert,Uncategorized — superspark @ 6:12 am

I know Martha Stewart can be divisive. There are those who aspire to be the new Martha of say, healthy eating or hip interior decorating. And then there are those who loathe her and can see only a demon behind the outwardly placid and angelic face. Among food bloggers, as far as I can tell, the real divide is based not on her personality so much as on how her recipes turn out. On several of the blogs I read regularly, I have seen multiple posts lamenting that yet another Martha Stewart recipe has turned out just plain bad, that the proportions of ingredients are off or the finished product tasted terrible. I can’t claim to care enough to weigh in on Martha’s moral virtue, but I can speak in defense of her baked goods, at least those that I’ve found in The Best of Martha Stewart Living: Desserts (which can apparently be currently procured for as little as $0.24 on Amazon!).

Should you be willing to dole out $0.24, you will find yourself smitten by pictures of glorious cakes, like this one and this one, both of which I made in quick succession and with great success last spring.  More recently, I tore myself away from the cake section to try the recipe for cranberry lemon squares and met with similarly good results.  Whatever problems others have had with Martha’s recipes, I’ve got no beef with her.  This variation on the classic lemon square was sweet and puckery, mixing the tangy tastes of lemon and cranberry.  Although there are three separate components to prepare (crust, cranberry layer, and lemon layer), they came together simply and without much ado.  I was a little skeptical about their appearance when I pulled them out of the oven and the deep red of the cranberry peeked through the lemon layer in parts, but a quick sprinkling of powdered sugar and the problem was solved.  So forget your feelings about Martha; if you love a lemon bar and are looking for a new variation,  this one is worth a try.

Cranberry lemon squares (makes 16)

Ingredients:

6 tbsp cold unsalted butter, cut into 12 pieces plus more for pan
1 1/ cups dried cranberries (about 7 oz)
1/4 cup confectioner’s sugar, plus more for dusting
1 cup all-purpose flour
2 large eggs
1/4 cup granulated sugar
1/4 cup plus 1 1/2 tsp freshly squeezed lemon juice (about 3 lemons)

1. Heat oven to 325. Butter an 8-inch square baking pan and set aside.

2. In a medium saucepan, combine cranberries and 2 cups water; bring to a boil. Reduce heat to medium, and cook, stirring occasionally, until water has been absorbed, about 25 minutes.

3. Transfer cranberry mixture to bowl of a food processor; chop coarsely. Set aside.

4. In a bowl of an electric mixer fitted with a paddle attachment, combine confectioners’ sugar and 3/4 cup flour. Add the butter, beating on low speed until mixture forms pea-sized pieces. Press batter into baking pan.

5. Bake until golden, about 20 minutes. Transfer to a wire rack to cool.

6. Beat eggs and granulated sugar until smooth. Add lemon juice; beat to combine. Add remaining 1/4 cup flour and beat to combine. Set lemon mixture aside.

7. Reduce oven temperature to 300. Spread cranberry mixture over cooked crust. Pour lemon mixture over the cranberry mixture. Bake until set, about 40 minutes. Transfer to a wire rack to cool, 40 minutes. Chill 4 hours. To serve, cut into squares and dust with confectioners’ sugar.


Chocolate whipped cream icebox cake May 20, 2008

Filed under: Dessert,Uncategorized — superspark @ 6:27 pm

My husband, Dylan, is maybe the smartest, or at least the most knowledgable, person I know. He is intrepidly curious, someone who is always trying to not only learn, but master, new skills. While I cringe when I hear the word “hobby”, Dylan has no shortage of pastimes, from scuba diving to marathon running to knitting to acting. On the eve of a camping trip, he decided that it would be the perfect time to learn how to throw knives (luckily a hobby that he quickly lost interest in). But above all, he’s known in our circles as a chef. His creations are creative and ambitious and nearly always executed on a large scale. Whereas I prefer to cook cozy weeknight dinners for the two of us, Dylan likes nothing more than to cook a five-course meal for a crowd.

Along with this ambition, though, is an aversion to anything pre-made. He loathes cake mixes and detests semi-homemade cooking of the Sandra Lee variety. Which is the only reason I can think of for why he actively prevented me from making this chocolate whipped cream icebox cake from Smitten Kitchen for over a year. Every time a holiday or birthday approached, I’d propose this cake, mentioning how very delightful it looked, how easy, how delicious, how Oprah herself was a huge fan. And without fail he pooh-poohed the idea of making it, refusing to call it a cake and saying that it would inevitably disappoint the birthday girl or boy.

Last weekend, though, we celebrated Dylan’s very own birthday and found ourselves in the predicament of hosting a party without knowing how many people would show. Naturally, there would be a main birthday cake, made from scratch with love. But wasn’t this the perfect time to make a quick and easy “back-up” cake, say one that doesn’t even require baking, but just an overnight chilling in the fridge? I made an executive decision and when I found the rare and coveted Nabisco famous chocolate wafers that comprise the “cake” at our local grocery store, it seemed it was meant to be.

People, I love my Dylan, but I can only blame him for keeping me from this cake for so long. Even he was forced to eat his words as he spooned soft, decadent layers of homemade whipped cream and cookies, softened to perfection, into his mouth. Dare I say it, I think he may have preferred this cake to the homemade one (which was quite delicious, itself). Learn from my lesson and ignore the nay-sayers who tell you that it’s not a real cake, who say that spending a mere 20-30 minutes on a birthday cake is embarrassing. Your friends will ask you for the recipe, will scrape their plates, will sing the praises of this cake and its’ gifted chef. It’s just that good.

Chocolate Whipped Cream Icebox Cake (serves 10+)

Ingredients:

3 cups heavy cream
3 tablespoons sugar
1 tablespoon vanilla extract
2 (9-ounce) packages chocolate wafer cookies
Unsweetened cocoa (or chocolate shavings)

1. In a large bowl, beat cream, sugar and vanilla with an electric mixer on high speed until soft peaks form.

2. On a flat serving plate, arrange 7 cookies side by side in a circle, keeping 1 cookie in the center.

3. Spread with 1/2 cup whipped cream, making a 7-inch circle. Repeat with remaining cookies and cream, making 11 layers of cookies and ending with a layer of cream (there may be a few cookies left over). Cover with plastic wrap and refrigerate overnight.

4. To serve, dust top lightly with cocoa powder or chocolate shavings.